fbpx How to Produce a Livestream Event, Part 2 | HowlRound Theatre Commons

How to Produce a Livestream Event, Part 2

A Beginner’s Guide to Using the Commons-based OBS Studio Live Broadcast Software

The ability to create professional broadcast programming similar to what is seen on television has finally been democratized thanks to the countercultural dynamics of commons-based peer production. An excellent example of this alternative economic and cultural model—which is frequently embodied as open-source software development—is OBS Studio. OBS Studio is software created by a large and passionate community of volunteer creative technologists and it enables anyone to create broadcasts, which have the potential to rival traditional corporate broadcasting in terms of production value—and accomplish all of this for free.

The paradigm of an open-source project opposes artificial scarcity, centers value-creation that’s available freely to all, and thrives on collectivism and community stewardship. It is commoning in action. Hopefully, this ethos will emerge into the mainstream for nonprofit arts and cultural sectors grappling with their own purpose and relevance in this moment of severe challenges and the possible futures they want to help create.

In my first post “How to Produce a Livestreamed Event,” I focused on how to produce a basic livestream using the Zoom video conference platform, the importance of prioritizing accessibility and inclusion in the design of a livestreaming event, and why the free and open-source video conference platform Jitsi Meet is a good alternative to Zoom for financial reasons and/or ethical and pro-social reasons.

For those producers who wish to increase the production quality and creative possibilities of their livestream event design beyond Zoom and Jitsi Meet’s built-in livestream capabilities, this part 2 will present a brief overview of how to use OBS Studio. OBS allows users to compose a broadcast program with multiple video, image, and audio sources, and then switch between them for different looks during a live broadcast. It is basically a “video mixer” or video switcher that can bring in a video conference like Zoom or Jitsi Meet, bring in still images, bring in pre-recorded video—and offer tools to help compose a final public broadcast.

For example, if you are livestreaming an event that includes a live Jitsi Meet video call and also shows pre-recorded video of an artist’s performance, you can cut between these two original sources, essentially editing live for the benefit of the online audience that sees the final editing decisions at a livestream destination such as YouTube or Facebook. In addition, you can create specific visual looks, like displaying graphics, to communicate additional information, such as where to send in questions.

The paradigm of an open-source project opposes artificial scarcity, centers value-creation that’s available freely to all, and thrives on collectivism and community stewardship. It is commoning in action.

When Not to Use OBS Studio

If your remote, physically distant video conference event wants to be a “town hall” type of meeting, where you would like many people to see and hear and connect with each other in real time but would additionally like to livestream to people who are not present inside the video conference, you can use the built-in feature that Jitsi Meet has for livestreaming to YouTube Live, or the built-in feature that Zoom Pro has for livestreaming to YouTube Live and Facebook Live. (See this workflow in the part 1 post.) In this case, you don’t necessarily need OBS Studio. If you want to show pre-recorded video at this event, you would use the screenshare feature that both Jitsi Meet and Zoom have built into their applications.

The disadvantage is that the quality of the pre-recorded video will not be as good in a screenshare compared to using OBS Studio to broadcast a pre-recorded video file. But for many events where the visual presence and immediacy of video conference participants is important, this minor tradeoff in the quality is perfectly acceptable.

When to Use OBS Studio

OBS Studio is best used for presentational broadcast-type events where most, if not all, of your audiences are experiencing the live event by watching YouTube, Facebook, or other livestream destinations—and are not logged into a video conferencing platform themselves. If pre-recorded video is being used, the quality of the livestreamed video will be better with OBS Studio. You can design the look of the livestream broadcast in infinite ways. The one trade-off compared to just using Zoom or Jitsi Meet is that the panelists or artists in the video conference won’t be able to see the pre-recorded video within the video conference and may need to watch on another device. (There are advanced workflows for this challenge, though. One of them involves a second computer using the OBS Studio NDI plugin in combination with NDI Virtual Input software.)

Working with partners where the internet is scarce and expensive was an incredibly important and creative limitation.

Case Study: Open Channels

Open Channels was a three-hour presentational, physically distant livestreamed event that used a combination of live video and pre-recorded video and included artists from the United States, Cuba, and other Caribbean countries. The organizers partnered with HowlRound, and together we decided to use Jitsi Meet as the live video conferencing platform, primarily because Zoom is not available for Cubans due to United States government sanctions against Cuba. Cuba also has limited access to broadband internet, and most of the artists watching and participating in the event did so through their mobile phone service providers, which have metered and prepaid data service plans.

I was the OBS Studio operator for the event, operating from Boston, and working with partners where the internet is scarce and expensive was an incredibly important and creative limitation. How the event organizers in Cuba and New Orleans made use of the available time, what needed to be synchronous conversation, and what needed to be pre-recorded video format were all creative questions that we in the consumption-heavy Global North are not used to asking.

video chat screenshot

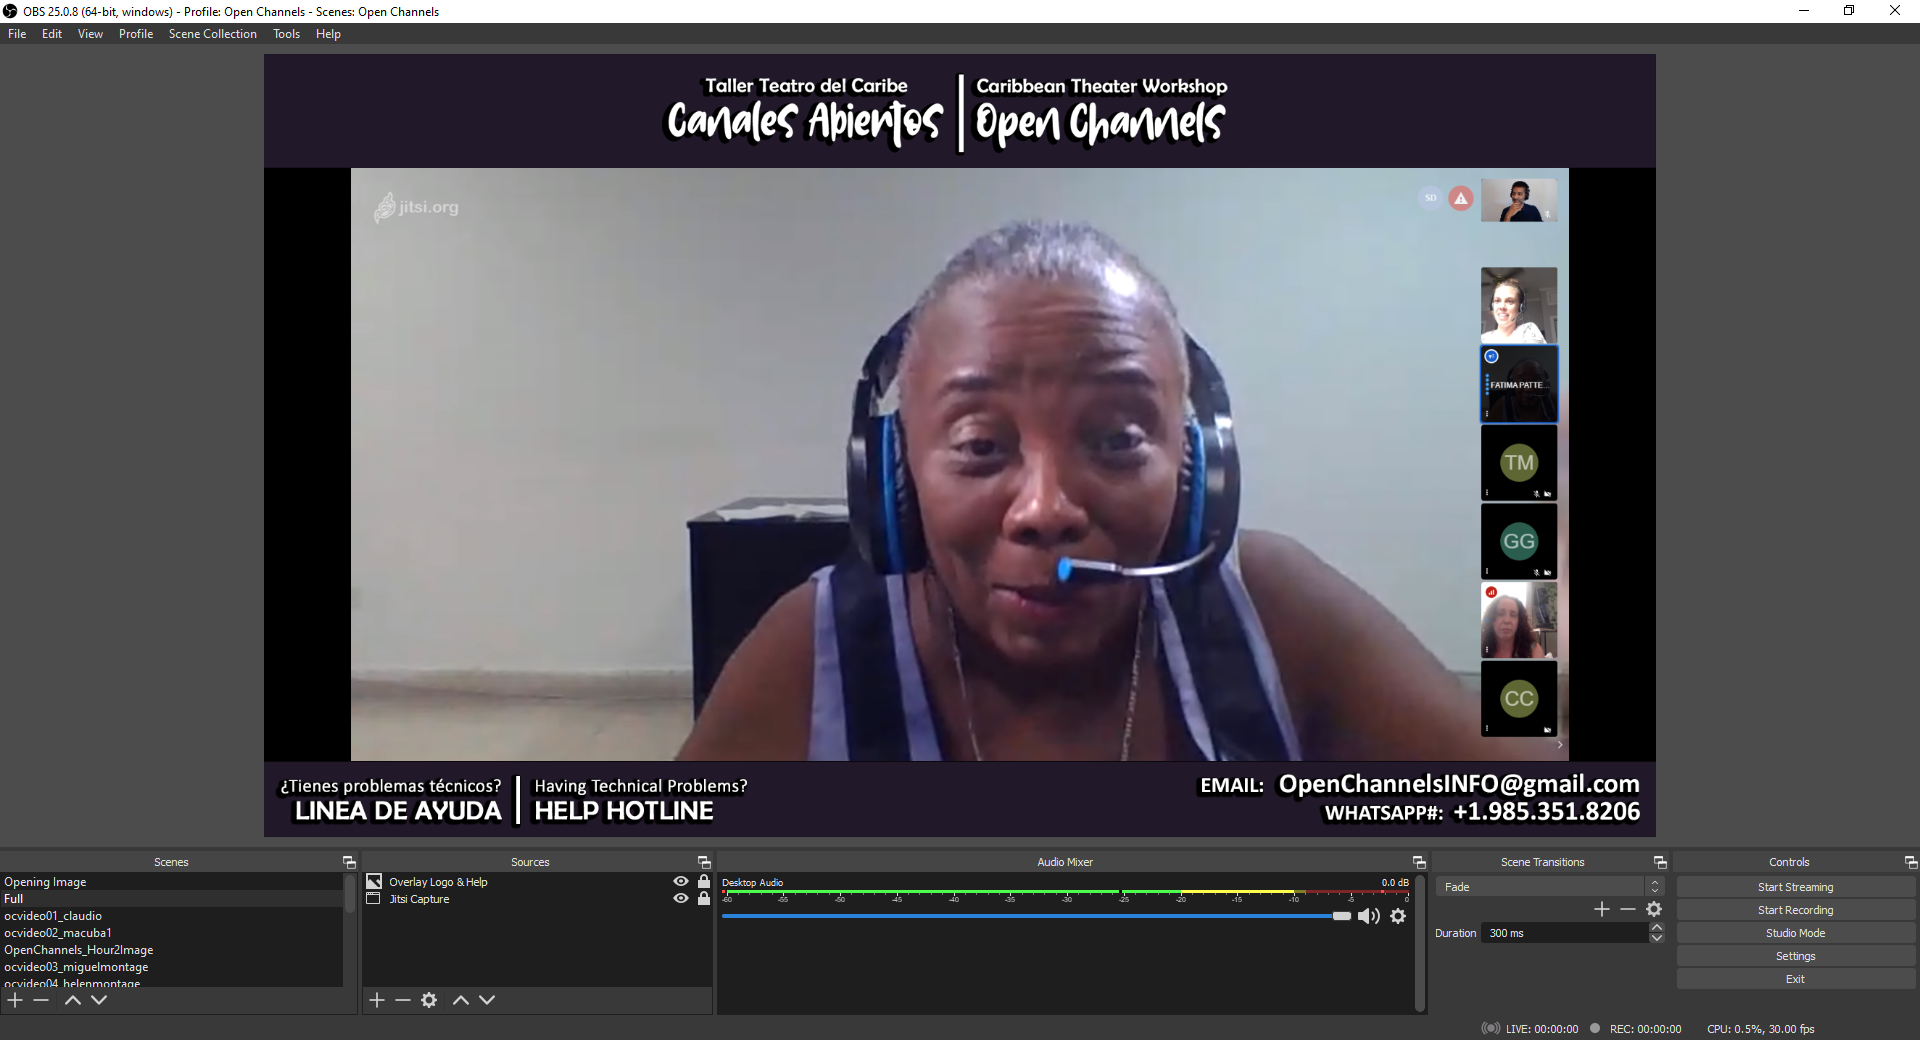
The Jitsi Meet video conference brought into a “scene” as a “window source.”

The above image is a screen capture of OBS Studio, specifically for how we produced Open Channels. On the bottom left is the list of “scenes”—what the audience sees in the final program—I had prepared and composed ahead of the event; each scene consists of one or more “sources” or media (images, video, audio, text) that you add and compose to make a “scene.” Through the course of the event, I clicked on each scene at the appropriate moment, switching between pre-recorded video and the live video conference. The sources that made up the scene were “image” sources, which is that dark purple border that displays the title of the event and contact information for audience who want to ask questions or who need technical help. The only other source for that above scene was the Jitsi Meet video conference room that I brought into OBS through a source called “Window Capture.”

For this event I used a Windows desktop computer with two monitors attached to it. I made the Jitsi Meet video conference—running on a Google Chrome web browser—full screen on my second monitor, and I had OBS Studio visible to me on my primary monitor. It is possible to operate with just one monitor, though having a second one makes things a lot more convenient.

Being able to access free and powerful tools like OBS Studio and Jitsi Meet enabled new connections between these historically isolated theatre communities. The resource and data efficiency possibilities of both tools were also really important in order for these cultural and artistic exchanges to take place.

video chat screenshot

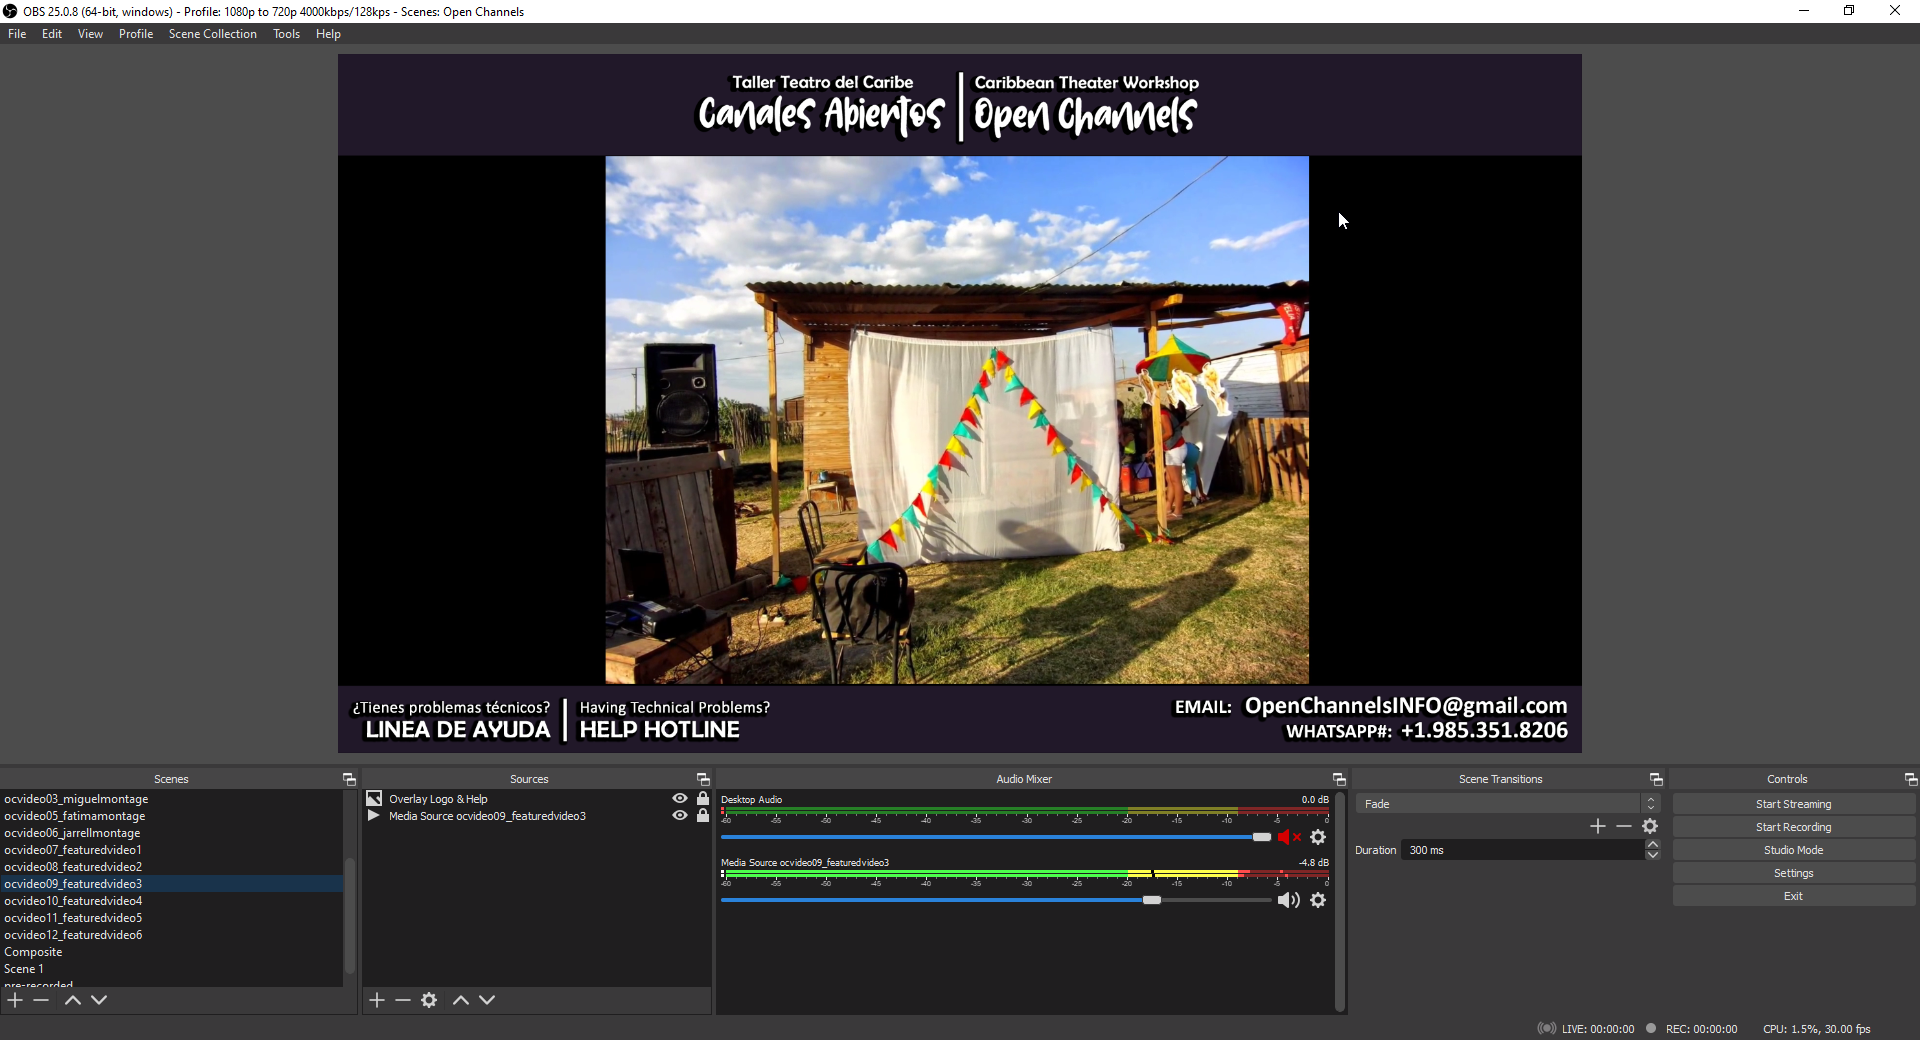
A scene where the source is a pre-recorded video file, added to the scene as a “media source.”

obs software screenshot

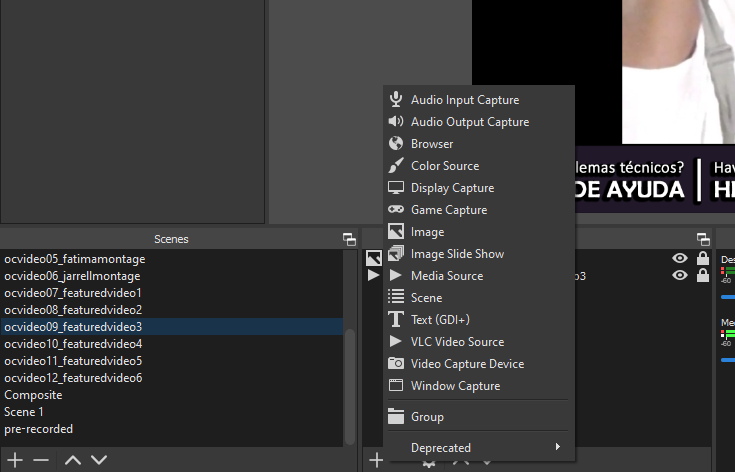
A list of custom-made scenes pictured to the left, and the available choices of what kind of sources you can add to scenes on the right.

Case Study: Grantmakers in the Arts

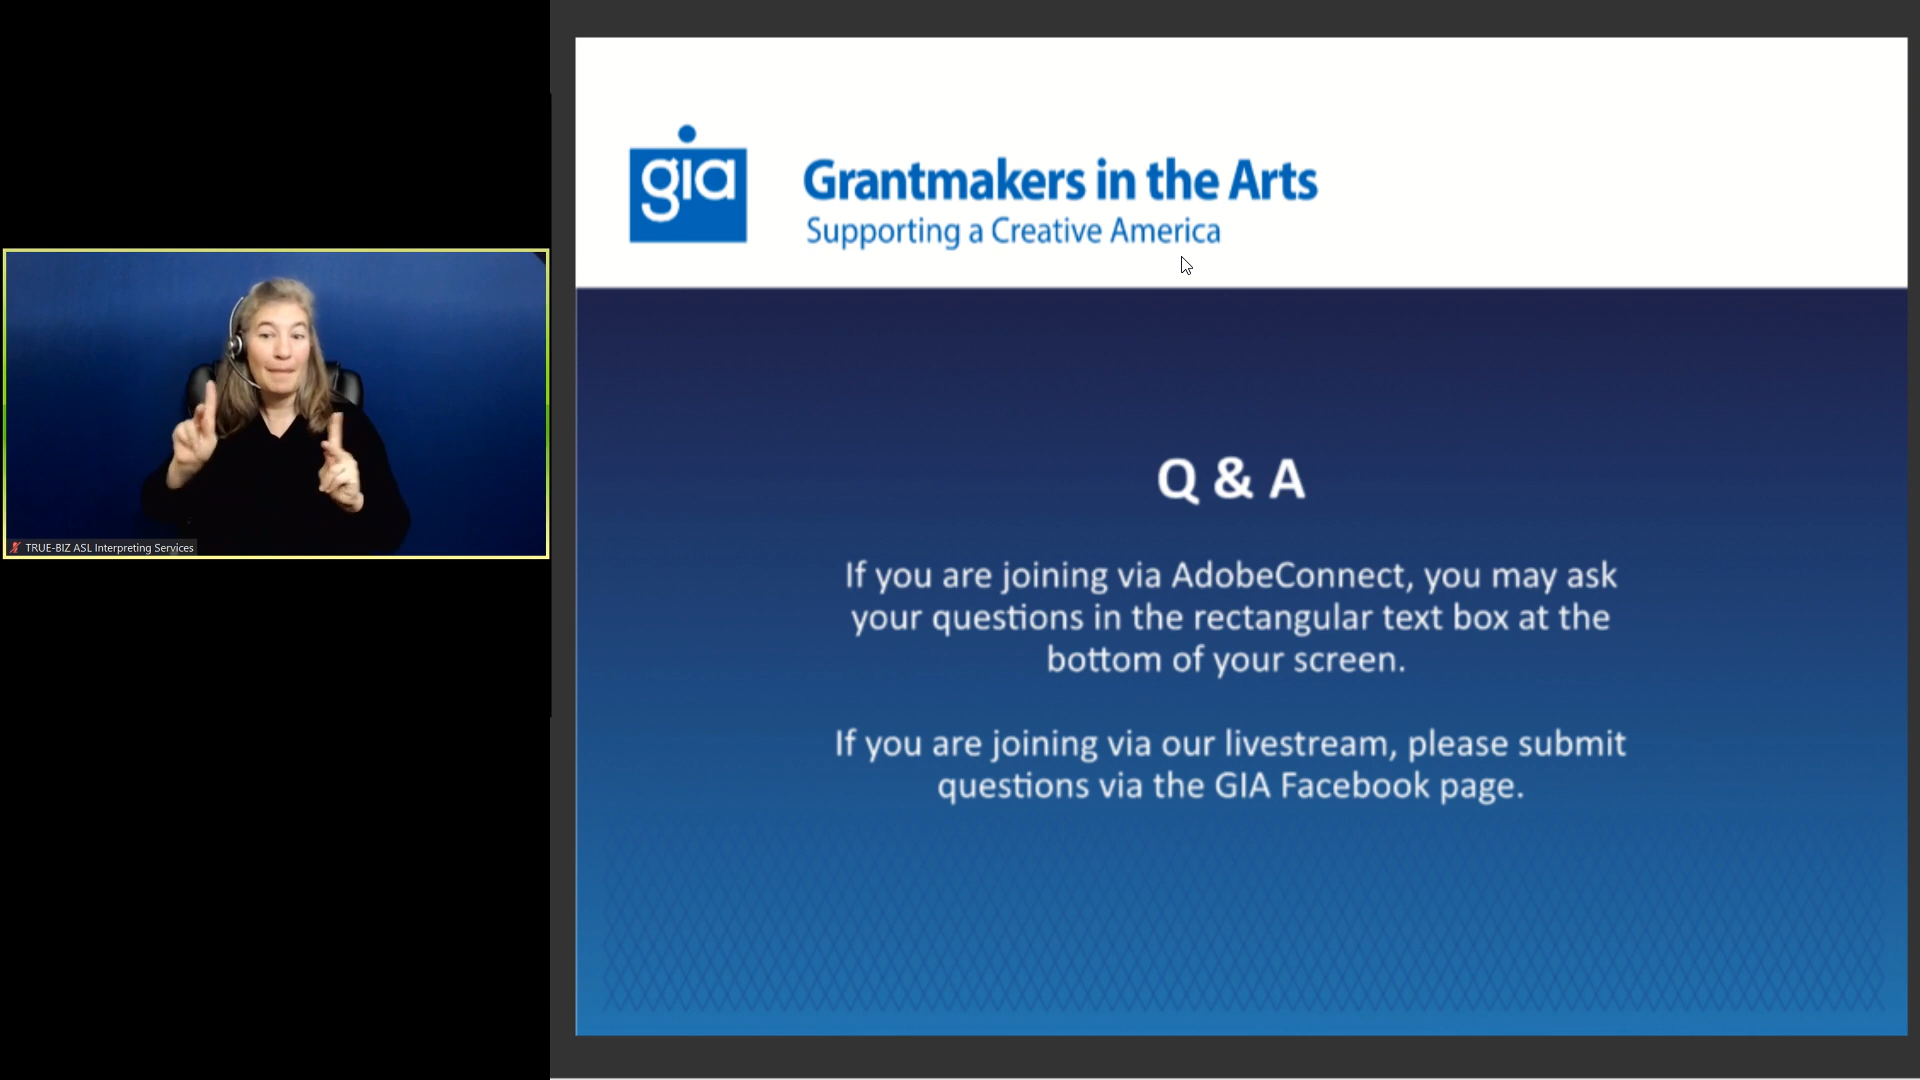
In March 2020, at the very beginning of the shelter-in-place order in the United States, Grantmakers in the Arts hosted a webinar called Emergency Preparedness and Response: COVID-19 and the Arts Ecosystem and partnered with HowlRound to provide more accessibility for the event. Using OBS Studio, I was able to add sign language interpreters to the existing webinar by creating a scene that used two “window” sources: one was Adobe Connect, where webinar attendees received the program, and the other was Zoom. Within OBS, I was able to position the two windows in any visual configuration I wanted.

video presentation screenshot

Mixing two “window sources” (a Zoom meeting and an Adobe Connect Webinar) in OBS Studio to compose a “Scene” that then gets broadcasted out to a livestream destination.

In terms of the audio, the sign language interpreters were able to hear the webinar in order to interpret into American Sign Language by simply logging into the Adobe Connect Webinar to listen, and they used a private Zoom meeting with just me in order to produce their simultaneous sign language interpretation. I just needed to take their live Zoom video and layer it next to the Webinar video—all within OBS Studio— which then sent out the final program for the public broadcast to various livestream destinations such as Facebook.

We also had live human-written captions for this event. The audio for the captions writer was the Adobe Connect Webinar. Their captions appeared in a captions webpage (like this example on Recapd) as well as embedded in a box below the live video player on the HowlRound website. It would have also been possible to bring those captions into OBS through a “window” source and use various filters to layer the text over the primary image.

This example illustrates that you can mix several different sources together and then send your final program to a livestream destination of your choosing. The webinar audiences that wanted sign language interpretation had the option of watching the livestream video player and didn’t need to log into the Adobe Connect Webinar software.

Software and Hardware

I have opted to use a Windows operating system desktop computer as the majority of the OBS Studio development community is Windows-based. There are many plugins that provide additional functionality to OBS Studio and these plugins are usually for Windows machines only.

Apple MacOSX, popular among artists especially in the United States, is compatible with OBS Studio, however, in order to reproduce the two scenarios in case studies presented above, you would require additional audio routing software to be installed on your Mac in order to pick up the audio that is outputting from any other application window. Some audio routing software options are the free and open-source BlackHole and the paid and commercial Loopback.

If you find this is too complicated, another option is using two computers: you can run the video conference on computer A and you can run OBS Studio on computer B. You would connect computer A to a video capture card/device HDMI to USB, which costs approximately $25 USD or less. On computer B you would bring in computer A’s audio/video as an OBS Studio “video capture device” source. (Webcams get brought into OBS with this same source option.)

It is incumbent on event producers to really rethink our designs and treat our online communications and productions as precious and scarce resources.

Towards a Low-Carbon, Low-Tech, and Inclusive Aesthetic

The final output resolution I recommend for any livestream event is 720p or even less (1280×720 px, aka standard HD) at 30 frames per second or 25 frames per second. I do not recommend 1080p (1920x1080) or full HD, as this resolution needlessly increases your upload internet bandwidth load and your overall energy usage significantly without adding much quality to the end user.

The logic of consumer technology always posits a higher resolution as “better,” however this is the same logic that refuses to acknowledge there is and will be limitations to energy access and limits to internet bandwidth in the future as we transition to a post-carbon civilization either in a controlled manner or in out-of-control crises. These very real resource limitations exist already in many rural and disenfranchised areas of the Global North and are the norm in many places in the Global South.

Despite what marketers of consumer technology would like us to believe, there is no such thing as “unlimited” when it comes to access to data or energy consumption. It is incumbent on event producers to really rethink our designs and treat our online communications and productions as precious and scarce resources. Not everything needs to have video and not every communication needs to use digital means. It is possible that our ability to livestream in the Global North will be metered in some way as it is frequently in the Global South. We should start learning right now how to make what we produce online matter and within the limitations of time and electricity.

Contributing to a Different Paradigm

If you or your organization are interested in supporting the values that open-source tools exemplify and that the arts and culture sector can considerably benefit from—consider donating money, time, and other resources to free and open-source projects, including OBS Studio. But there are also to other options to support. One is Peertube, a free/libre software funded by the French nonprofit organization Framasoft that’s building a livestreaming destination alternative to broadcasting on Facebook, YouTube, Twitch, Vimeo and other giant corporate and commercial livestream destinations. Another is LiveLab, a free and open-source browser-based media router for collaborative performance developed by the United States–based nonprofit CultureHub. LiveLab is a high-end alternative to Jitsi Meet, Zoom, Skype NDI, or any other live video conference platform and allows users to take an individual video conference participant and use that video as an individual source in OBS Studio, giving infinite customization control over your final livestream compositions.

We also want to hear from you about using OBS Studio. What has worked for you? What hasn’t? Share your thoughts in the comments below.

Bookmark this page

Log in to add a bookmark

Comments

0
Add Comment

The article is just the start of the conversation—we want to know what you think about this subject, too! HowlRound is a space for knowledge-sharing, and we welcome spirited, thoughtful, and on-topic dialogue. Find our full comments policy here

Newest First